UnityPostprocess
Table of Contents
UnityPostprocess note.
<!– more –>
UnityPostprocessStack Version 2
使用 PPS
- 加载 profile,赋值给 PostProcessVolume。
- 修改 Effect 参数, 不写入到后处理配置文件中。
  using UnityEngine;
  using UnityEngine.Rendering.PostProcessing;

  public class ChangeGrayscale : MonoBehaviour
  {
      public PostProcessProfile profile;
      PostProcessProfile curProfile;

      [Range(0,1)]
      public float blendV = 0.5f;
      float preBlendV = 0;
      private void Start()
      {
          var ppl = GetComponent<PostProcessLayer>();
          var ppv = GetComponent<PostProcessVolume>();
          // 设置profile时使用sharedProfile 设置之前需要先清除之前设置的profile
          ppv.profile = null;
          #if UNITY_EDITOR
              // 避免Editor下运行时对profile的修改被保存
              ppv.sharedProfile = UnityEngine.Object.Instantiate<PostProcessProfile>(profile);
          #else
              ppv.sharedProfile = profile;
          #endif
          // 后续操作都通过 curProfile 进行,保证使用sharedProfile
          curProfile = ppv.sharedProfile;
      }

      void Update()
      {
          if(preBlendV != blendV)
          {
              Grayscale grayscale;
              if(curProfile.TryGetSettings<Grayscale>(out grayscale))
              {
                  //grayscale.blend.Override(blendV);
                  grayscale.blend.value = blendV;
              }
              preBlendV = blendV;
          }
      }
  }
Writing Custom Effects
CSharp 实现
- PostProcess 性质的第二个参数指定了效果生效的时机
- BeforeTransparent: 效果在不透明物体绘制结束,透明物体开始绘制之前被应用。
- BeforeStack: 效果在内置后处理之前被应用。 内置的后处理有 anti-aliasing, depth-of-field, tonemapping etc
- AfterStack: 效果在内置后处理之后在 FXAA 和 final-pass 之前被应用。
- BeforeTransparent: 效果在不透明物体绘制结束,透明物体开始绘制之前被应用。
- PostProcess 性质的第四个参数是可选的,用于指定该效果在 SceneView 中是否生效
- 为了支持 PostProcessEffectSettings 中的参数混合和覆盖,需要对参数进行包装。例如使用 FloatParameter 类型,而不是直接使用 float 类型。
using System;
using System.Collections;
using System.Collections.Generic;
using UnityEngine;
using UnityEngine.Rendering.PostProcessing;


[Serializable]
[PostProcess(typeof(GDepthOfFieldRenderer), PostProcessEvent.BeforeStack, "Custom/GDepthOfField")]
public class GDepthOfField : PostProcessEffectSettings
{
}

public class GDepthOfFieldRenderer : PostProcessEffectRenderer<GDepthOfField>
{
    Shader shader;
    public override void Init()
    {
        shader = Shader.Find("Hidden/Custom/GDepthOfField");
    }

    public override void Render(PostProcessRenderContext context)
    {
        var cmd = context.command;

        if (shader == null) return;
        var sheet = context.propertySheets.Get(shader);
        if (sheet == null) return;

        cmd.BeginSample("GDepthOfField");
        // ......
        cmd.BlitFullscreenTriangle(context.source, context.destination, sheet, 0);

        cmd.EndSample("GDepthOfField End");
    }
}
Shader 实现
  Shader "Hidden/Custom/GDepthOfField"
  {
      Properties
      {
          //_MainTex ("Texture", 2D) = "white" {}
      }
      SubShader
      {
          // No culling or depth
          Cull Off ZWrite Off ZTest Always

          CGINCLUDE
          #include "UnityCG.cginc"

          struct appdata
          {
            float4 vertex : POSITION;
            float2 uv : TEXCOORD0;
          };

          struct v2f
          {
            float2 uv : TEXCOORD0;
            float4 vertex : SV_POSITION;
          };

          v2f vert (appdata v)
          {
            v2f o;
            o.vertex = float4(v.vertex.xy, 0, 1);
            o.uv = (v.vertex + 1) * 0.5;
            #if UNITY_UV_STARTS_AT_TOP
            o.uv= o.uv * float2(1.0, -1.0) + float2(0.0, 1.0);
            #endif
            return o;
          }

          sampler2D _MainTex;
          float4 _MainTex_TexelSize;

          half3 Sample(float2 uv)
          {
            return tex2D(_MainTex, uv).rgb;
          }

          ENDCG
          Pass // 0
          {
              CGPROGRAM
              #pragma vertex vert
              #pragma fragment frag
              fixed4 frag (v2f i) : SV_Target
              {
                return half4(Sample(i.uv, 1), 1);
              }
              ENDCG
          }
      }
  }
Source Code
Q&A
RuntimeUtilities.fullscreenTriangle 为什么只有一个三角形,且三角形顶点坐标中会有 3?
Postprocess 没有通过绘制两个三角形来实现绘制整个屏幕,而是通过绘制一个超出屏幕的大三角形来覆盖整个屏幕,这样不仅减少了 DrawCall,而且减少了 Overdraw(绘制两个三角形时,屏幕对角线占用的像素需要绘制两次,从而产生了 Overdraw).
下图为绘制 fullscreenTriangle 的图示,其中淡黄色区域为实际绘制的部分,其他部分都会被剔除。
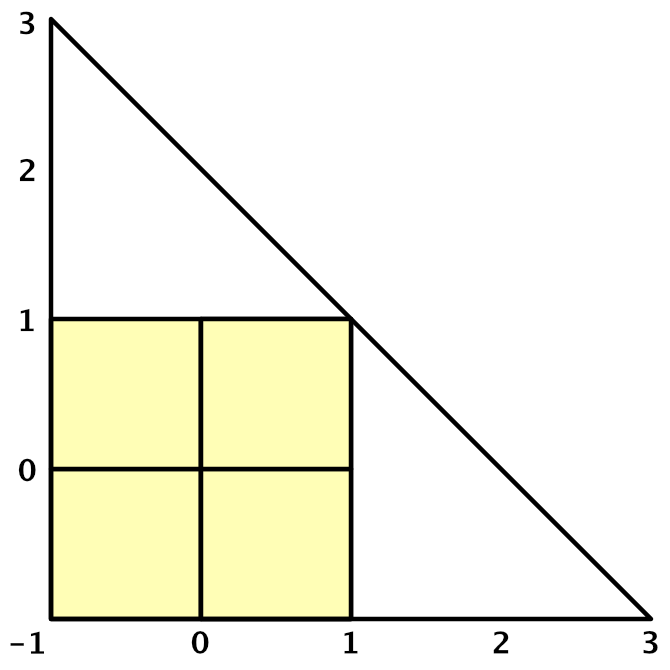
static Mesh s_FullscreenTriangle = null;
public static Mesh fullscreenTriangle
{
    get
    {
        if (s_FullscreenTriangle != null)
        return s_FullscreenTriangle;

        s_FullscreenTriangle = new Mesh { name = "Fullscreen Triangle" };

        // Because we have to support older platforms (GLES2/3, DX9 etc) we can't do all of
        // this directly in the vertex shader using vertex ids :(
        s_FullscreenTriangle.SetVertices(new List<Vector3>
            {
                new Vector3(-1f, -1f, 0f),
                new Vector3(-1f,  3f, 0f),
                new Vector3( 3f, -1f, 0f)
            });
        s_FullscreenTriangle.SetIndices(new [] { 0, 1, 2 }, MeshTopology.Triangles, 0, false);
        s_FullscreenTriangle.UploadMeshData(false);

        return s_FullscreenTriangle;
    }
}
  // Vertex manipulation
  float2 TransformTriangleVertexToUV(float2 vertex)
  {
      float2 uv = (vertex + 1.0) * 0.5;
      return uv;
  }

  VaryingsDefault VertDefault(AttributesDefault v)
  {
      VaryingsDefault o;
      // 顶点坐标不经过MVP变换,顶点已经在ClipSpace坐标系中([-1,1]范围外的顶点在后续裁剪操作中都会被剔除)。
      o.vertex = float4(v.vertex.xy, 0.0, 1.0);
      // uv 直接通过顶点坐标求得
      o.texcoord = TransformTriangleVertexToUV(v.vertex.xy);

  #if UNITY_UV_STARTS_AT_TOP
      o.texcoord = o.texcoord * float2(1.0, -1.0) + float2(0.0, 1.0);
  #endif

      o.texcoordStereo = TransformStereoScreenSpaceTex(o.texcoord, 1.0);

      return o;
  }
PPSV2 整个流程做了哪些事情?
初始化
PostProcessLayer.OnEnable() 中会调用 PostProcessLayer.Init() PostProcessLayer.InitBundles()
运行
PostProcessLayer.OnPreRender() 中会调用 PostProcessLayer.BuildCommandBuffers(); 只有在 VR 模式下,OnPreRender 中的 BuildCommandBuffers();才会被调用。
PostProcessLayer.OnPreCull() 中会调用 PostProcessLayer.BuildCommandBuffers();
PPSV2 是如何控制效果生效的时机的?
public enum PostProcessEvent
{
    /// <summary>
    /// Effects at this injection points will execute before transparent objects are rendered.
    /// </summary>
    BeforeTransparent = 0,

    /// <summary>
    /// Effects at this injection points will execute after temporal anti-aliasing and before
    /// builtin effects are rendered.
    /// </summary>
    BeforeStack = 1,

    /// <summary>
    /// Effects at this injection points will execute after builtin effects have been rendered
    /// and before the final pass that does FXAA and applies dithering.
    /// </summary>
    AfterStack = 2,
}
PPSV2 中通过 PostProcessEvent 枚举来定义后处理效果生效的时机。
ERROR: FrameDebug 死循环,看不到 DrawCall
cmd.BeginSample("GBloomPyramid");
// ......

// 缺少EndSample
cmd.EndSample("GBloomPyramid-END");
ERROR: _MainTex 属性没有传递到自己的 GBloom.shader 中
// RuntimeUtilieties.cs
void BlitFullscreenTriangle(this CommandBuffer cmd, RenderTargetIdentifier source, RenderTargetIdentifier destination, PropertySheet propertySheet, int pass, RenderBufferLoadAction loadAction, Rect? viewport = null)
{
        // 通过GlobalTexture来设置属性的,所以当Property列表中包含 _MainTex属性会导致GlobalTexture设置失效
    cmd.SetGlobalTexture(ShaderIDs.MainTex, source);
    // ......
}

Properties
{
        //
    //_MainTex ("Texture", 2D) = "white" {}
}
URP Postprocess
Usage
Lens Flare
- 开启 Camera 下 PostProcess 选项
- Assets/Create/LensFlare(SRP) 创建 Lens Flare 资源
- 在对象上添加 Lens Flare 脚本 Rendering/LensFlare(SRP), 为组件指定 LensFlare 资源
可以参考 unitycatlike/Assets/MyTest/URP_SRP/07_LensFlare。
Lens Flare 资源的具体配置参数可以参考下面官方文档:
为摄像机指定 VolumeTrigger 和 VolumeLayerMask
var uaCamData = camera.GetComponent<UniversalAdditionalCameraData>();
uaCamData.volumeTrigger = someGObj.transform;
uaCamData.volumeLayerMask = 1<<30;
Writing Custom Effects
自定义 RenderFeature
添加后期效果到 Volume 中
扩展 VolumeComponent
Packages/com.unity.render-pipelines.universal/Runtime/Overrides/ScreenSpaceLightShaft.cs
[Serializable, VolumeComponentMenuForRenderPipeline("Post-processing/Custom/Screen Space Light Shaft", typeof(UniversalRenderPipeline))]
public class ScreenSpaceLightShaft: VolumeComponent, IPostProcessComponent
{
    public BoolParameter isEnabled = new BoolParameter(false);
    public Vector2Parameter toScreenSpace = new Vector2Parameter(Vector2.one);
    public ClampedFloatParameter kernelRadius = new ClampedFloatParameter(1, 0.1f, 4);
    public ClampedFloatParameter depth = new ClampedFloatParameter(1, 0.1f, 4);
    // ......
}
实现 LightShaftSamplerPass
Packages/com.unity.render-pipelines.universal/Runtime/Passes/LightShaftSamplerPass.cs
public class LightShaftSamplerPass: ScriptableRenderPass
{
    readonly Material m_LightShaftSamplerMat;
    readonly GraphicsFormat m_LightShaftRTFormat;
    const int kRTWidth = 64;
    const int kRTHeight = 64;

    RenderTargetHandle[] m_LightShaftRTHs;
    RenderTargetHandle m_LightShaftCoverageMap0;
    RenderTargetHandle m_LightShaftCoverageMap1;
    ScreenSpaceLightShaft[] m_LightShafts = new ScreenSpaceLightShaft[ScreenSpaceLightShaft.kLightShaftCount];
    DynamicArray<int> m_ActiveLightShaftIndexArr = new DynamicArray<int>(ScreenSpaceLightShaft.kLightShaftCount);

    public LightShaftSamplerPass(RenderPassEvent evt, PostProcessData data)
    {
        // ......
    }
    public override void Execute(ScriptableRenderContext context, ref RenderingData renderingData)
    {
        // ......
    }
    public override void OnFinishCameraStackRendering(CommandBuffer cmd)
    {
        // ......
    }
    public void Cleanup()
    {
        // ......
    }
}
将 LightShaftSamplerPass 添加到 PostProcessPasses
Packages/com.unity.render-pipelines.universal/Runtime/PostProcessPasses.cs
internal struct PostProcessPasses : IDisposable
{
    ColorGradingLutPass m_ColorGradingLutPass;
    PostProcessPass m_PostProcessPass;
    PostProcessPass m_FinalPostProcessPass;
    // 添加 LightShaftSamplerPass
    LightShaftSamplerPass m_LightShaftSamplerPass;
    // ......
    public PostProcessPasses(PostProcessData rendererPostProcessData, Material blitMaterial)
    {
        m_ColorGradingLutPass = null;
        m_PostProcessPass = null;
        m_FinalPostProcessPass = null;
        m_LightShaftSamplerPass = null;
        // ......

        Recreate(rendererPostProcessData);
    }

    public void Recreate(PostProcessData data)
    {
        // ......

        if (data != null)
        {
            m_ColorGradingLutPass = new ColorGradingLutPass(RenderPassEvent.BeforeRenderingPrePasses, data);
            m_PostProcessPass = new PostProcessPass(RenderPassEvent.BeforeRenderingPostProcessing, data, m_BlitMaterial);
            m_FinalPostProcessPass = new PostProcessPass(RenderPassEvent.AfterRenderingPostProcessing, data, m_BlitMaterial);
            // 创建 LightShaftSamplerPass
            m_LightShaftSamplerPass = new LightShaftSamplerPass(RenderPassEvent.BeforeRenderingTransparents, data);
            m_CurrentPostProcessData = data;
        }
    }

    public void Dispose()
    {
        // always dispose unmanaged resources
        m_ColorGradingLutPass?.Cleanup();
        // 清理 m_LightShaftSamplerPass
        m_LightShaftSamplerPass?.Cleanup();
        m_PostProcessPass?.Cleanup();
        m_FinalPostProcessPass?.Cleanup();
    }
}
使用 Timeline 来控制 Volume 后期效果的参数
定义 Timeline 需要控制的 Volume 后期效果参数结构体
Timeline 不会控制所有 Volume 的参数,定义 Timeline 的后期效果参数结构体,可以减少 Timeline 存储的数据量。另外,定义统一的结构体,可以同时适配 URP 和 HDRP。
[Serializable]
public class LensDistortionParams
{
    public bool Enabled = false;
    public AnimationCurve Intensity = new AnimationCurve();
    public AnimationCurve XMultiplier = new AnimationCurve();
    public AnimationCurve YMultiplier = new AnimationCurve();
    public AnimationCurve Scale = new AnimationCurve();
}

[Serializable]
public class VignetteParams
{
    public bool Enabled = false;
    public Gradient Color = new Gradient();
    public AnimationCurve CenterX = AnimationCurve.Constant(0, 1, 0.5f);
    public AnimationCurve CenterY = AnimationCurve.Constant(0, 1, 0.5f);
    public AnimationCurve Intensity = AnimationCurve.Constant(0, 1, 1.0f);
    public AnimationCurve Smoothness = AnimationCurve.Constant(0, 1, 0.0f);
}

[Serializable]
public class ChromaticAberrationParams
{
    public bool Enabled = false;
    public AnimationCurve Intensity = AnimationCurve.Constant(0, 1, 0.0f);
}
在 Update 中将后期效果参数同步给 VolumeComponent
void Start()
{
    m_volume = gameObject.AddComponent<Volume>();
    m_volume.isGlobal = true;
    m_volume.priority = 10;
    var p = ScriptableObject.CreateInstance<VolumeProfile>();
    m_lensDistortion = p.Add<LensDistortion>();
    m_vignette = p.Add<Vignette>();
    m_chromaticAberration = p.Add<ChromaticAberration>();
    m_volume.profile = p;
}

void Update()
{
    if (m_lensDistortion)
    {
        m_lensDistortion.active = LensDistortion.Enabled;
        m_lensDistortion.intensity.Override(LensDistortion.Intensity.Evaluate(ts));
        m_lensDistortion.xMultiplier.Override(LensDistortion.XMultiplier.Evaluate(ts));
        m_lensDistortion.yMultiplier.Override(LensDistortion.YMultiplier.Evaluate(ts));
        m_lensDistortion.scale.Override(LensDistortion.Scale.Evaluate(ts));
    }

    if (m_vignette)
    {
        m_vignette.active = Vignette.Enabled;
        m_vignette.color.Override(Vignette.Color.Evaluate(ts));
        m_vignette.center.Override(new Vector2(Vignette.CenterX.Evaluate(ts), Vignette.CenterY.Evaluate(ts)));
        m_vignette.intensity.Override(Vignette.Intensity.Evaluate(ts));
        m_vignette.smoothness.Override(Vignette.Smoothness.Evaluate(ts));
    }

    if (m_chromaticAberration)
    {
        m_chromaticAberration.active = ChromaticAberration.Enabled;
        m_chromaticAberration.intensity.Override(ChromaticAberration.Intensity.Evaluate(ts));
    }
}
URP Blit
方案 1
利用 URP 中的 Blitter 来绘制全屏的三角形。
Blitter.BlitCameraTexture(cmd, mSourceTexture, ssrRTH0, Material, (int)ShaderPass.Raymarching);
vertex shader 和 fragment shader 的实现可以复用 URP 的实现,也可参考 URP shader 实现自定义的 shader。
com.unity.render-pipelines.core@14.0.8/Runtime/Utilities/Blit.hlsl
方案 2
自己实现绘制全屏三角形
Shader "Hidden/Blit"
{
    SubShader
    {
        Tags { "RenderType" = "Opaque" "RenderPipeline" = "UniversalPipeline"}
        LOD 100

        Pass
        {
            Name "Blit"
            ZTest Always
            ZWrite Off
            Cull Off

            HLSLPROGRAM
            #pragma vertex Vert
            #pragma fragment Fragment

            #include "Packages/com.unity.render-pipelines.universal/ShaderLibrary/Core.hlsl"

            TEXTURE2D_X(_SourceTex);
            SAMPLER(sampler_SourceTex);

            struct Attributes
            {
                float4 positionOS : POSITION;
                float2 uv         : TEXCOORD0;
                UNITY_VERTEX_INPUT_INSTANCE_ID
            };

            struct Varyings
            {
                float4 positionCS : SV_POSITION;
                float2 uv         : TEXCOORD0;
                UNITY_VERTEX_OUTPUT_STEREO
            };

            Varyings Vert(Attributes input)
            {
                Varyings output;
                UNITY_SETUP_INSTANCE_ID(input);
                UNITY_INITIALIZE_VERTEX_OUTPUT_STEREO(output);

                output.positionCS = float4(input.positionOS.xy, 0, 1);
                output.uv = (input.positionOS.xy + 1) * 0.5;
                #if UNITY_UV_STARTS_AT_TOP
                output.uv = output.uv * half2(1, -1) + half2(0, 1);
                #endif
                return output;
            }

            half4 Fragment(Varyings input) : SV_Target
            {
                UNITY_SETUP_STEREO_EYE_INDEX_POST_VERTEX(input);

                half4 col = SAMPLE_TEXTURE2D_X(_SourceTex, sampler_SourceTex, input.uv);

                return col;
            }
            ENDHLSL
        }
    }
}
上面 Blit Shader 需要使用自定义的 DrawMesh 操作,不能直接使用 CommandBuffer 的 Blit 操作。如下:
cmd.DrawMesh(RenderingUtils.fullscreenMesh, Matrix4x4.identity, rfMaterial, 0, 1);
Source Code
代码结构
下面主要列出 Runtime 下目录结构
com.unity.render-pipelines.universal@10.5.0
├─Runtime
│ ├─2D
│ │ ├─Passes
│ │ │ └─Utility
│ │ └─Shadows
│ ├─Data
│ ├─External
│ │ └─LibTessDotNet
│ ├─Materials
│ │ ├─ArnoldStandardSurface
│ │ └─PhysicalMaterial3DsMax
│ ├─Overrides / 内置后处理配置数据
│ │ ├─Bloom /
│ │ ├─Tonemapping /
│ │ ├─…… /
│ │ └─DepthOfField /
│ ├─Passes / 内置 Pass
│ │ ├─ColorGradingLutPass / 生成 color grading lut, 其中包含了 ChannelMixer ColorAdjustments ColorCurves LiftGammaGain ShadowsMidtonesHighlights SplitToning Tonemapping WhiteBalance 效果
│ │ ├─PostProcessPass / 后处理 Pass, 内置后处理 DrawCall 逻辑
│ │ ├─…… /
│ │ └─FinalBlitPass /
│ ├─RendererFeatures / 内置 RendererFeatures
│ │ ├─ScreenSpaceAmbientOcclusion / SSAO
│ │ └─RenderObjects //
│ └─XR
Q&A
GetFullScreenTriangleVertexPosition GetFullScreenTriangleTexCoord
// 只考虑xy,通过第一行代码得到,
// 索引0, x: 0<<1=00, 00&10=00 y: 00&10=0,所以0号位对应坐标为0,0
// 索引1, x: 1<<1=10, 10&10=10 y: 01&10=0, 所以1号位对应坐标为2,0
// 索引2, x: 2<<1=100, 100&010=000 y:10&10=10,所以2号位对应坐标为0,2
// *2-1映射后,顶点的坐标为
// v0:-1,-1
// v1:3,-1
// v2:-1,3
float4 GetFullScreenTriangleVertexPosition(uint vertexID, float z = UNITY_NEAR_CLIP_VALUE)
{
    float2 uv = float2((vertexID << 1) & 2, vertexID & 2);
    return float4(uv * 2.0 - 1.0, z, 1.0);
}

// 索引0, x: 0<<1=00, 00&10=00 y: 00&10=0,所以0号位对应UV坐标为0,0
// 索引1, x: 1<<1=10, 10&10=10 y: 01&10=0, 所以1号位对应UV坐标为2,0
// 索引2, x: 2<<1=100, 100&010=000 y:10&10=10,所以2号位对应UV坐标为0,2
float2 GetFullScreenTriangleTexCoord(uint vertexID)
{
#if UNITY_UV_STARTS_AT_TOP
    return float2((vertexID << 1) & 2, 1.0 - (vertexID & 2));
#else
    return float2((vertexID << 1) & 2, vertexID & 2);
#endif
}
Common
Bloom
Bloom 优化
- Post-processing Effects on Mobile: Optimization and Alternatives https://community.arm.com/arm-community-blogs/b/graphics-gaming-and-vr-blog/posts/post-processing-effects-on-mobile-optimization-and-alternatives