VolumetricLightScattering
Table of Contents
VolumetricLightScattering note.
<!– more –>
VolumetricLightScattering
Basic Knowledge
体渲染相关概念
吸收(absorption):光能转化为介质内其它形式的能(如热能)。
外散射(out-scattering):光打在介质粒子上散射到其它方向去了。
自发光(emission):介质内其它形式的能(如热能)转化成光能。
内散射(in-scattering):其它方向来的光打在介质粒子上恰好散射到本方向上。
丁达尔效应
可见光的波长约在 400~700 nm 之间,当光线射入分散体系时,一部分自由地通过,一部分被吸收、反射或散射,可能发生以下三种情况:
(1)当光束通过粗分散体系,由于分散质的粒子大于入射光的波长,主要发生反射或折射现象,使体系呈现混浊。
(2)当光线通过胶体溶液,由于分散质粒子的直径一般在 1~100 nm 之间,小于入射光的波长,主要发生散射,可以看见乳白色的光柱,出现丁达尔现象。
(3)当光束通过分子溶液,由于溶液十分均匀,散射光因相互干涉而完全抵消,看不见散射光。
瑞利散射
瑞利散射是由远小于辐射波长的粒子对光或其他电磁辐射的散射。散射量与光的波长的四次方成反比(波长越短 Rayleigh 散射越强)。
波长 = 光速 * 1/频率
空气分子对光的散射就属于 Rayleigh Scattering,瑞利散射是各向同性的,吸收可以忽略。
太阳光谱中波长较短的蓝紫光比波长较长的红光散射更明显,而短波中又以蓝光能量最大,所以在雨过天晴或秋高气爽时(空中较粗微粒比较少,以分子散射为主),在大气分子的强烈散射作用下,蓝色光被散射至弥漫天空,天空即呈现蔚蓝色。
米氏散射
当大气中粒子的直径与辐射的波长相当时发生的散射。这种散射主要由大气中的微粒,如烟、尘埃、小水滴及气溶胶等引起。米氏散射的散射强度与波长的二次方成反比,并且散射在光线向前方向比向后方向更强,方向性比较明显。
米氏散射是各向异性的,具有很强的 forward lobe 和更高的吸收比例。
LightShaft
RayMarching LightShaft 0
- 渲染光源方向的深度图
- 渲染摄像机方向的深度图
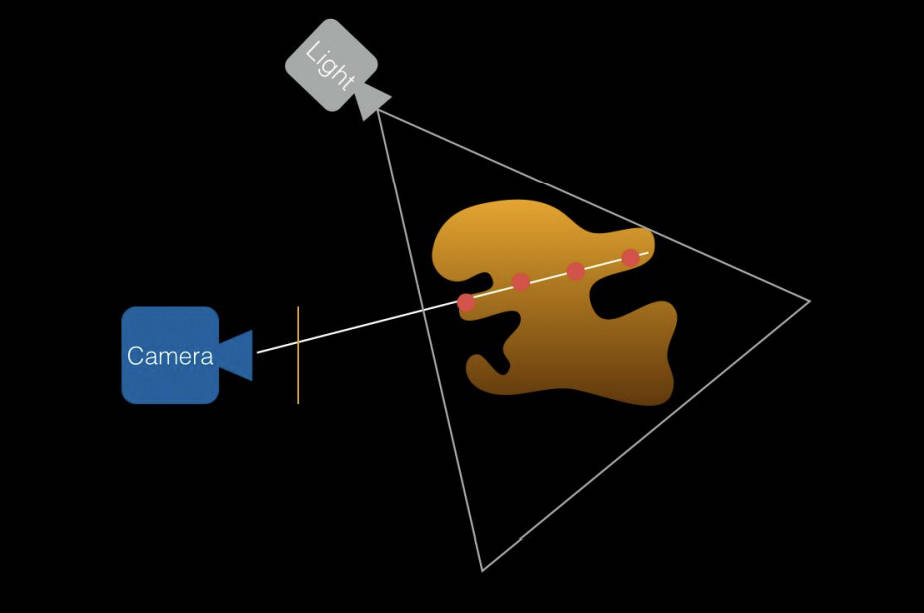
- 以摄像机原点为射线原点,以摄像机到当前着色点方向为射线方向,以摄像机深度为射线最远距离。
- 若当前 RayMarching 点不在阴影中,并且 RayMarching 点在光源范围内,则表示该点对 LightShaft 效果有贡献,否则无贡献。
- 将当前 RayMarching 点转化到光源空间内,若 RayMarching 点的深度 <= 光源空间 DepthRT 深度,则表示其不在阴影中。
- 将当前 RayMarching 点转化到光源空间内,若 RayMarching 点的深度 <= 光源空间 DepthRT 深度,则表示其不在阴影中。
Tips:
方向光范围是无限大,所以只需要考虑 RayMarching 点是否在阴影中
Point Light 和 Spot Light 的范围都是有限的,需要考虑 RayMarching 点是否在光源范围内
下面代码实现了方向光的体积光效果:
Shader "Hidden/Toguchi/PostProcessing/LightShaft"
{
    Properties
    {
        _MainTex ("Texture", 2D) = "white" {}
    }

HLSLINCLUDE
    #include "Packages/com.unity.render-pipelines.universal/ShaderLibrary/Core.hlsl"
    #include "Packages/com.unity.render-pipelines.universal/ShaderLibrary/Lighting.hlsl"
    #include "Packages/com.unity.render-pipelines.universal/Shaders/PostProcessing/Common.hlsl"

    TEXTURE2D_X(_MainTex);
    TEXTURE2D_X_FLOAT(_CameraDepthTexture);
    SAMPLER(sampler_CameraDepthTexture);

    TEXTURE2D_X(_LightShaftTempTex);

    half4 _MainTex_ST;
    float4 _MainTex_TexelSize;

    float4 _CamWorldSpace;
    float4x4 _CamFrustum, _CamToWorld;
    int _MaxIterations;
    float _MaxDistance;
    float _MinDistance;

    float _Intensity;

    struct RayVaryings
    {
        float4 positionCS    : SV_POSITION;
        float2 uv            : TEXCOORD0;
        float4 ray           : TEXCOORD1;
    };

    RayVaryings Vert_Ray(Attributes input)
    {
        RayVaryings output;
        output.positionCS = TransformObjectToHClip(input.positionOS.xyz);
        output.uv = input.uv;

        int index = output.uv.x + 2 * output.uv.y;
        output.ray = _CamFrustum[index];

        return output;
    }

    float GetRandomNumber(float2 texCoord, int Seed)
    {
        return frac(sin(dot(texCoord.xy, float2(12.9898, 78.233)) + Seed) * 43758.5453);
    }

    half4 SimpleRaymarching(float3 rayOrigin, float3 rayDirection, float depth)
    {
        half4 result = float4(_MainLightColor.xyz, 1) * _Intensity;

        float step = _MaxDistance / _MaxIterations;
        float t = _MinDistance + step * GetRandomNumber(rayDirection, _Time.y * 100);
        float alpha = 0;

        for(int i = 0; i < _MaxIterations; i++)
        {
            if(t > _MaxDistance || t >= depth)
            {
                break;
            }

            float3 p = rayOrigin + rayDirection * t;

            float4 shadowCoord = TransformWorldToShadowCoord(p);
            float shadow = SAMPLE_TEXTURE2D_SHADOW(_MainLightShadowmapTexture, sampler_MainLightShadowmapTexture, shadowCoord);
            if(shadow >= 1) // 当前点不在阴影中
            {
                alpha += step * 0.2;
            }

            t += step;
        }

        result.a *= saturate(alpha);

        return result;
    }

    half4 Frag(RayVaryings input) : SV_Target
    {
        float depth = SAMPLE_TEXTURE2D_X(_CameraDepthTexture, sampler_LinearClamp, input.uv).r;
        depth = Linear01Depth(depth, _ZBufferParams);
        depth *= length(input.ray);

        float3 rayOrigin = _CamWorldSpace;
        float3 rayDir = normalize(input.ray);
        float4 result = SimpleRaymarching(rayOrigin, rayDir, depth);

        return result;
    }

    half4 Frag_Combine(Varyings input) : SV_Target
    {
        half4 color = SAMPLE_TEXTURE2D_X(_MainTex, sampler_LinearClamp , input.uv);
        half4 shaft = SAMPLE_TEXTURE2D_X(_LightShaftTempTex, sampler_LinearClamp, input.uv);

        color.rgb = color.rgb * (1 - shaft.a) + shaft.rgb * shaft.a;
        return color;
    }
ENDHLSL

    SubShader
    {
        Tags { "RenderType" = "Opaque" "RenderPipeline" = "UniversalPipeline"}
        LOD 100
        ZTest Always ZWrite Off Cull Off

        Pass
        {
            Name "GradientFog"

            HLSLPROGRAM
                #pragma vertex Vert_Ray
                #pragma fragment Frag
            ENDHLSL
        }

        Pass
        {
            Name "Combine"

            HLSLPROGRAM
                #pragma vertex Vert
                #pragma fragment Frag_Combine
            ENDHLSL
        }
    }
}
RayMarching LightShaft 1
- 渲染光源以及遮挡物到 OcclusionRT
- 正常渲染场景到 framebuffer
- 以远离光源的方向进行 RayMarching。Occlusion 按照远离距离衰减,将 Occlusion 和 FrameBuffer 进行混合。
- 混合函数为 glBlendFunc(GL_SRC_ALPHA, GL_ONE);
- 混合函数为 glBlendFunc(GL_SRC_ALPHA, GL_ONE);

uniform float exposure;
uniform float decay;
uniform float density;
uniform float weight;
uniform vec2 lightPositionOnScreen;
uniform sampler2D firstPass;  // occlusion rt
const int NUM_SAMPLES = 100 ;

void main()
{
    vec2 deltaTextCoord = vec2( gl_TexCoord[0].st - lightPositionOnScreen.xy );
    vec2 textCoo = gl_TexCoord[0].st;
    deltaTextCoord *= 1.0 /  float(NUM_SAMPLES) * density;
    float illuminationDecay = 1.0;


    for(int i=0; i < NUM_SAMPLES ; i++)
    {
        textCoo -= deltaTextCoord;
        vec4 sample = texture2D(firstPass, textCoo );

        sample *= illuminationDecay * weight;

        gl_FragColor += sample;

        illuminationDecay *= decay;
    }
    gl_FragColor *= exposure;
}
light scattering with opengl https://fabiensanglard.net/lightScattering/ 有道云备份
RayMarching LightShaft 2
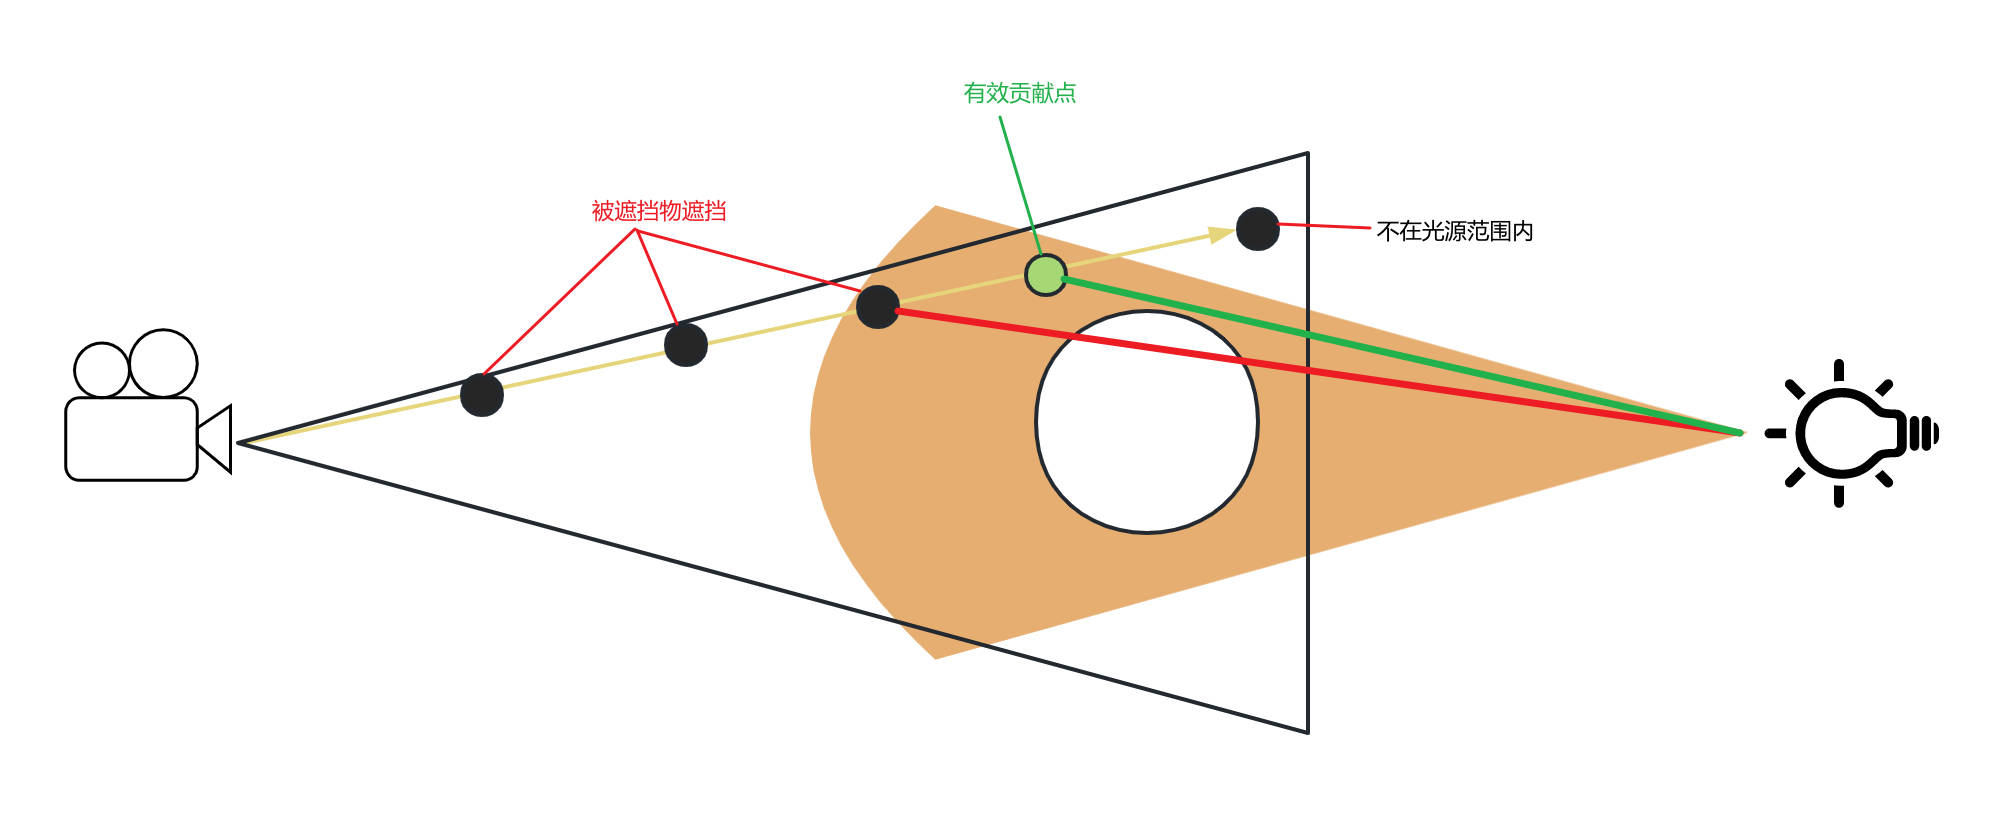
- 屏幕空间内,以当前着色点 pScreenUV 为原点,以光源着色点 lightScreenUV 为目标点。在这两个点之间进行 RayMarching。
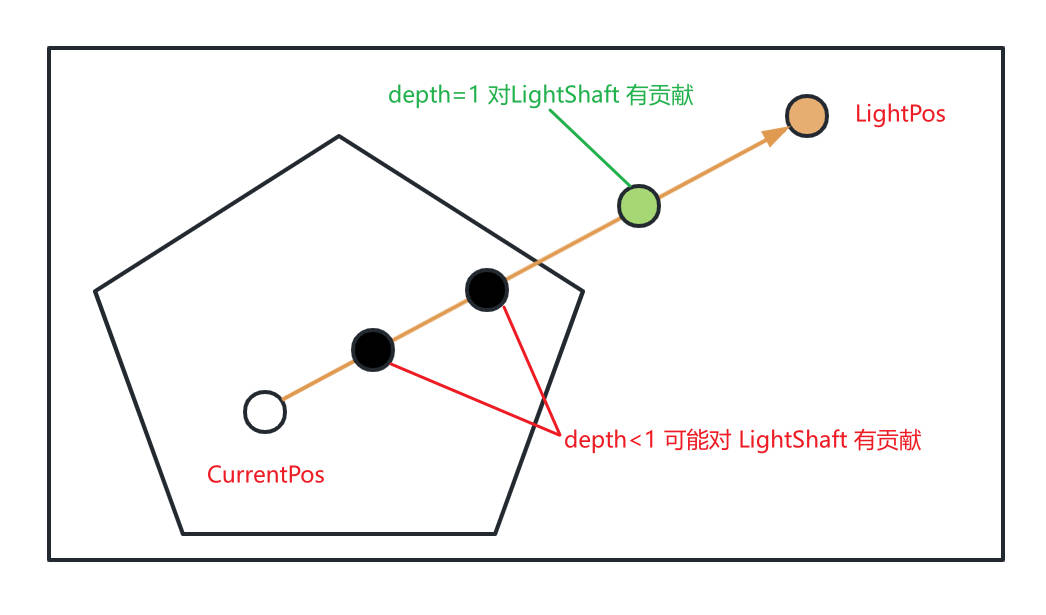
- 若当前 RayMarching 点对应的深度为 1,则表示该点必定不在阴影中,其对 LightShaft 效果有贡献,否则无贡献。
- 近似计算 RayMarching 点对 LightShaft 的贡献
- 近似计算 RayMarching 点对 LightShaft 的贡献
Unity GodRay https://zhuanlan.zhihu.com/p/144037609
UE4 LightShafts
Occlusion 方法
利用场景深度 RT 创建一个 Mask,以远离 light 的方向对该 Mask 进行多次 Blur 操作,将结果作为 fog 和大气的 mask。该方法和现实生活中的光束产生的原理类似 - 光束由雾气的阴影所生成。注意:这也意味着光束的强弱度只能和雾气和大气相同。原理同上面 RayMarching LightShaft 1
Bloom 方法
该方法在世界空间中的光源周围捕捉场景颜色(包括半透明度和雾气散射),并从光源进行径向模糊。此法并非对真实世界中发生的一切进行模拟,但可控性较高(不受雾气密度限制),视觉效果震撼。太阳周围存在突出的明亮区域(如明亮的云朵)时光晕法的使用效果最佳。明亮的太阳过小,会形成一定程度的锯齿,而且 Blur 操作是图像空间操作,消耗比较高。
Volumetric Light
Volumetric Light Beam
源码分析
根据 CameraDepthRT 计算屏幕上某点到摄像机的距离
inline float Depth_PS_GetSceneDepthFromEye(float4 uv, float3 posViewSpace)
{
    // rawDepth: depth rt中存储的depth值 [0, 1], non linear
    float rawDepth = VLBSampleDepthTexture(uv);
    // linearDepthPersp: 当前像素点的camera space 下的z值
    float linearDepthPersp = VLBLinearEyeDepth(rawDepth);

    // transform perspective depth from near plane to distance based on the eye
    // acosViewDirZ: 当前像素点方向 和 摄像机方向的夹角的 cos 值
    float acosViewDirZ = abs(normalize(posViewSpace.xyz).z); // TODO precompute that in VS?
    // linearDepthPersp: 当前像素点到 camera 的距离
    linearDepthPersp /= acosViewDirZ;

    float linearDepthOrtho = Depth_PS_GetLinearDepthOrtho(rawDepth);
    return lerp(linearDepthPersp, linearDepthOrtho, VLB_CAMERA_ORTHO);
}