xmake
Table of Contents
xmake note.
<!– more –>
xmake
Install
安装 Windows 版本
使用安装包
windows 下提供了预制的 nsis 安装包,我们可直接从 github 的 Releases 下载页面下载后,运行安装包即可。
从 Releases 上下载 windows 安装包 https://github.com/xmake-io/xmake/releases
运行安装程序 xmake-[version].exe, 如 xmake-master.win64.exe
vscode c/c++ 开发环境搭建
安装如下 vscode 插件:
| XMake | tboox | Extended XMake support in Visual Studio Code |
| C/C++ | Microsoft | C/C++ IntelliSense, debugging, and code browsing. |
| clangd | LLVM | C/C++ completion, navigation, and insights |
clangd 的代码补全基于一个叫做 compile_commands.json 的文件,我们首先告诉 clangd 去 build 目录下找。打开 clangd 设置,添加以下命令:
–compile-commands-dir=${workspaceFolder}/build

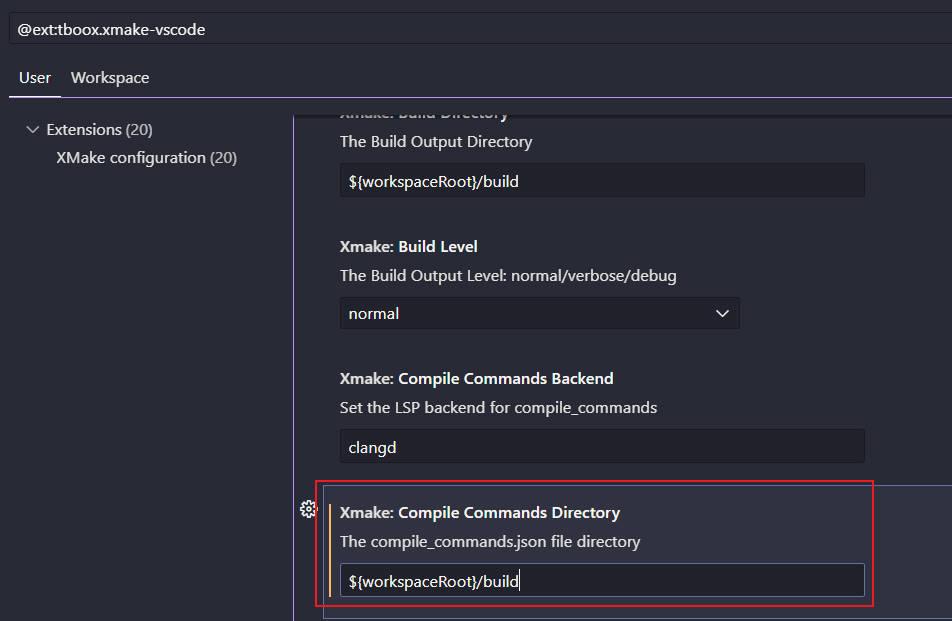
xmake 可以生成 compile_commands.json,但是其默认是将这个文件生成在.vscode 文件夹下,因此需要改一下 xmake 的设置,让它生成到 build 目录下:
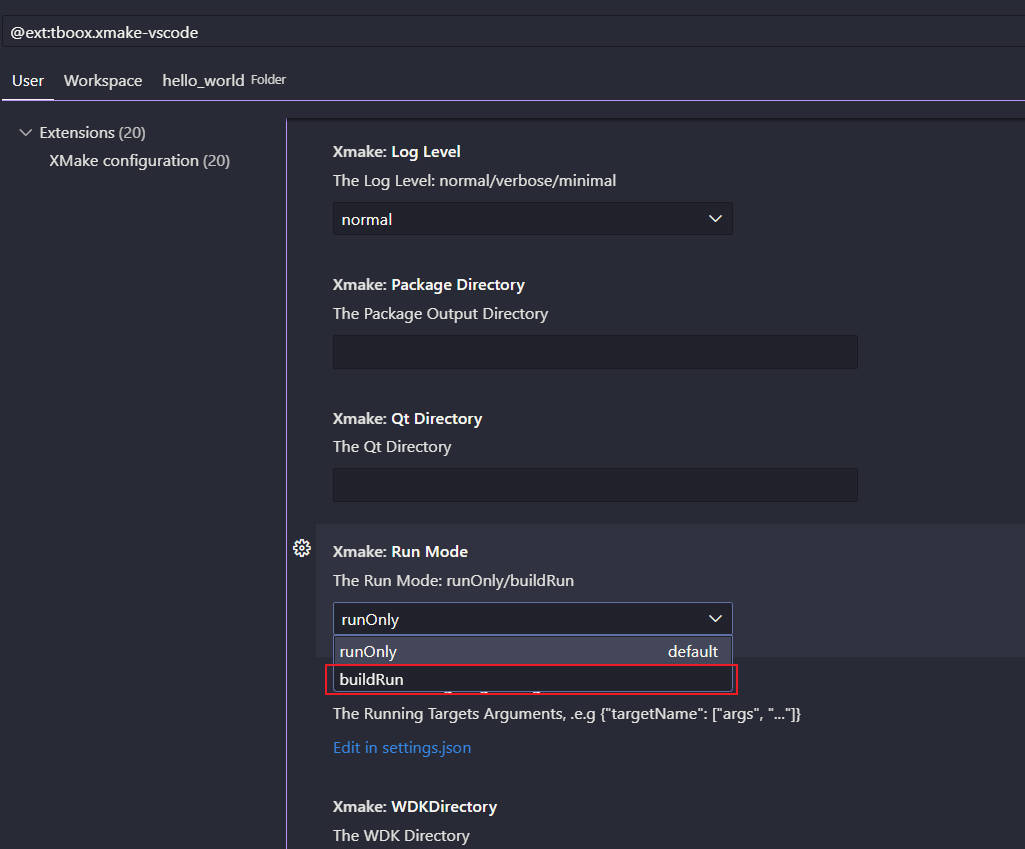
xmake 中 run 默认不会执行编译,进行如下配置,可使 run 时执行 build:
当 xmake.lua 文件发生修改时,就会自动在 build 目录下生成 compile_commands.json,到此所有的配置就完成了。
如果没有自动生成 compile_commands.json,我们可以在 vscode 中使用 >XMake: UpdateIntellisense 命令手动触发生成,或者在命令行中输入以下命令来生成。
xmake project -k compile_commands build
Base Usage
创建工程
方法 1:手动创建
- 创建工程目录
# 创建目录
mkdir hello_world
cd hello_world
- 创建 xmake.lua 文件
-- 创建 xmake.lua 文件, 使用下面内容填充
add_rules("mode.debug", "mode.release")
target("hello_world")
  set_kind("binary")
  add_files("src/*.cpp")
- 自动配置工程
# 自动配置工程
xmake f    # 或者 xmake config

# 查看工程配置, 如果没有配置工程,则自动配置工程
xmake f -v # 或者xmake config -v
方法 2:命令行
xmake create hello_world
# 上面命令生成如下目录结构和文件:
# hello_world
#   src/
#       main.cpp
#   .gitignore
#   xmake.lua
工程配置
# 自动配置工程
xmake f    # 或者 xmake config

# 查看工程配置, 如果没有配置工程,则自动配置工程
xmake f -v

# 配置platform architecture mode
xmake f -p [windows|linux|macosx|android|iphoneos ..] -a [x86|arm64 ..] -m [debug|release]

# 配置 vs版本
xmake f --vs=2022
C++包管理
查找 package
# 查找 vulkan package
## 可以看到 vulkansdk 是我们需要的package
xrepo search vulkan

# The package names:
#     vulkan:
#       -> vulkansdk: LunarG Vulkan® SDK (in xmake-repo)
#       -> volk-1.3.275+0: volk is a meta-loader for Vulkan (in xmake-repo)
#       -> glfw-3.4: GLFW is an Open Source, multi-platform library for OpenGL, OpenGL ES and Vulkan application development. (in xmake-repo)
# .......
查询 package 信息
# 查询 vulkansdk package 信息
xrepo info vulkansdk
# 下面的 configs 字段表示可以配置的信息
# The package info of project:
#     require(vulkansdk):
#       -> description: LunarG Vulkan® SDK
#       -> version: latest
#       -> repo: xmake-repo https://gitee.com/tboox/xmake-repo.git master
#       -> cachedir: C:\Users\wolfand11\AppData\Local\.xmake\cache\packages\2404\v\vulkansdk\latest
#       -> installdir: C:\Users\wolfand11\AppData\Local\.xmake\packages\v\vulkansdk\latest\46c06c99027e4154b6f020db58363b1d
#       -> searchdirs:
#       -> searchnames:
#       -> fetchinfo: latest
#       -> platforms: all
#       -> requires:
#          -> plat: windows
#          -> arch: x64
#          -> configs: #可以配置的信息
#             -> utils: table: 0000017A6478ECB0
#             -> runtimes: MT
#             -> shared: true
#             -> pic: true
#             -> debug: false
#       -> configs: #可以配置的信息
#          -> shared: Build shared library. (default: true) (readonly)
#          -> utils: Enabled vulkan utilities. (default: table: 0000017A6478ECB0)
#       -> configs (builtin): #可以配置的信息
#          -> debug: Enable debug symbols. (default: false)
#          -> pic: Enable the position independent code. (default: true)
#          -> lto: Enable the link-time build optimization. (type: boolean)
#          -> asan: Enable the address sanitizer. (type: boolean)
# ......
版本设置
add_requires("tbox 1.6.*", "pcre 1.3.x", "libpng ^1.18")
add_requires("libpng ~1.16", "zlib 1.1.2 || >=1.2.11 <1.3.0")
在 Vulkan Tutorial 中添加如下设置,会报错。目前版本设置还没摸清楚。
add_requires("glfw > 3.27.0")
删除包
使用 xrepo remove vulkansdk
编译运行
方法 1:VSCode 中直接操作
VSCode 中直接操作
方法 2:生成 VS 工程来操作
# 配置 vs版本
xmake f --vs=2022

# 参数-a x64就是生成pc 64位架构vs项目,如果输入-a x86则生成x86架构vs项目
xmake project -k vsxmake -a x64
- Window11 下使用 Xmake 构建 VS2022 sln 项目工程,并进行调试 https://zhuanlan.zhihu.com/p/576298652
方法 3:命令行中操作
# 编译
xmake build 09Multisampling
# 运行
xmake run 09Multisampling
调试
方法 1:VSCode 和 VS 工程中操作
方法 2:命令行中操作
# 切换到debug模式
xmake config -m debug
# 重新编译
xmake build 09Multisampling
# 运行
xmake run 09Multisampling
Vulkan Tutorial 配置
以 Vulkan Tutorial - Development environment 为例进行说明,Vulkan Tutorial - Development environment
add_rules("mode.debug", "mode.release")

rule("vulkan_tutorial")
    print(os.projectdir())
    if is_plat("windows") then
        --add_defines("ENGINE_ROOT_DIR=\"" .. (os.projectdir():gsub("\\", "\\\\")) .. "\\\\engine\"")
        print("platform is windows")
    else
        print("platform is others")
        --add_defines("ENGINE_ROOT_DIR=\"" .. (os.projectdir():gsub("\\", "/")) .. "/engine\"")
    end

    before_run(function (target)
        print("[shader] glsl to spirv..")
        import("utils")
        local vulkan_sdk = find_package("vulkansdk") --定位到vulkansdk的路径
        local glslang_validator_dir = vulkan_sdk["bindir"].."\\glslangValidator.exe" --获取到glslangValidator.exe的路径
        -- 遍历 shader 文件
        local targetName = target:name()
        for _, shader_path in ipairs(os.files("$(projectdir)/"..targetName.."/**")) do
            if utils.StrEndWith(shader_path, ".vert") or utils.StrEndWith(shader_path, ".frag") then
                local new_shader_path = string.gsub(shader_path, ".vert", ".spv")
                new_shader_path = string.gsub(new_shader_path, ".frag", ".spv")
                os.runv(glslang_validator_dir,{"-V", shader_path,"-o", new_shader_path}) --执行系统命令
                print("[shader] done: "..shader_path)
            end
        end
    end)
rule_end()

-- add_requires("vulkansdk", {debug=true})
-- add_requires("vulkansdk > 1.3.0", {debug=true})
set_languages("c++20")
add_requires("vulkansdk")
add_requires("glm")
add_requires("glfw")
add_requires("stb")
add_requires("tinyobjloader")

local targetName = "01DevelopmentEnvironment"
target(targetName)
    set_kind("binary")
    add_files(targetName .. "/*.cpp")
    add_packages("vulkansdk", "glm", "glfw")

targetName = "02DrawATriangle"
target(targetName)
    set_kind("binary")
    add_files(targetName .. "/*.cpp")
    -- 设置 build output directory
    --set_targetdir("../build/"..targetName)
    -- 设置 run directory (也就是工作目录)
    set_rundir("$(projectdir)/"..targetName)
    add_packages("vulkansdk", "glm", "glfw")
    add_rules("vulkan_tutorial")
    set_default(true)

targetName = "09Multisampling"
target(targetName)
    set_kind("binary")
    add_files(targetName .. "/*.cpp")
    -- 设置 build output directory
    --set_targetdir("../build/"..targetName)
    -- 设置 run directory (也就是工作目录)
    set_rundir("$(projectdir)/"..targetName)
    add_packages("vulkansdk", "glm", "glfw", "stb", "tinyobjloader")
    add_rules("vulkan_tutorial")
Q&A
how can i get target name in add_files
target("kth-largest-element-in-an-array")
    set_kind("binary")
    add_files("kth-largest-element-in-an-array.cpp")

-- 下面配置和上面配置等价
local name = "kth-largest-element-in-an-array"
target(name)
    set_kind("binary")
    add_files(name .. ".cpp")
参考资料
- 官网 https://xmake.io/#/zh-cn/guide/installation
- xmake github https://github.com/xmake-io/
- xmake-vscode github https://github.com/xmake-io/xmake-vscode
- xmake 教程 https://www.zhihu.com/column/c_1684334361686712320